Automation Through Azure DevOps with Bob
Several months ago, our team moved into the realm of automation through the use of Azure DevOps. I would say that evolution is a necessary cycle that occurs, and with evolution comes increased complexity. As offensive security professionals, this means that as defenses evolve, offense evolves to stay one step ahead, and as offense evolves, it has the potential to become more complex. If you didn’t get a chance to check out my last article, I highly encourage you to give it a quick read here. Today I’m going to share another tool I’ve created to assist in managing the complexity of generating payloads for offensive assessments. Everyone, say hello to Bob!
TL;DR
To skip straight to the details on how to use Bob, click here.
The Problem
Not to repeat the issue facing offensive teams, but manually building payloads sucks. I’m not talking about the problem-solving challenge of creating payloads, but compiling and substituting all of your options by hand is tedious and boring. Changeling assists with part of that, but what if swapping out embedded resources isn’t enough to reconfigure your tools? What if you still need to recompile a payload? If you haven’t read up on Azure DevOps, I encourage you to pause and read the introductory posts by @_xpn_ and @424f424f before continuing.
Once you are familiar with DevOps, you realize that it can be an incredible tool! However, queuing builds, and retrieving artifacts can be slightly cumbersome, especially if you are trying to move payloads across to a different op box. As Steve mentions in one of the articles above, there’s not a known way (at least to me) of selecting all pipelines and downloading artifacts for all of them. I needed a fast way to modify, build, and retrieve payloads on my assessments without needing to open up a web browser and tweak things, and I wanted these tasks to be repeatable, shareable, and easily retrievable. This is where Bob comes in.
Bob the Builder
Bob is a tool that allows teams to build complex configurations and toolsets based on pre-configured Azure DevOps Pipelines, and then share these configurations with team members so that anyone can pull down a toolset that makes sense for each engagement. Bob can be found on GitHub, but before you run off and start playing with it, let’s walk through its basic features together.
Taking Bob for a Walk
In the last post, we showed how Changeling could be used to swap resources on an example project. We will now take that project one step further, by including it in an Azure DevOps pipeline. Bob will use this pipeline to pass in configurations, build multiple versions of our demo for us, and then retrieve the artifacts so that we can use them locally. Our sample project can be found at https://github.com/coffeegist/changeling-demo. Let’s get right to it.
Preliminary Pipelines
For this walkthrough, we will use our newfound knowledge of Azure DevOps to create a pipeline that builds Changeling, and a pipeline that builds Changeling-Demo. These should be fairly straight forward, as they should simply clone the repos, and build as normal. The real fun will come in on a third pipeline that we will call Demo-Morph. Demo-Morph’s job will be to use Changeling to morph Changeling-Demo in any number of ways we tell it to.
Building Demo-Morph
To start off, we’ll obviously be swapping shellcode out, and we’ll need shellcode to be accessible for our pipeline. I will be placing my shellcode in a public shellcode-library repository. In practice, you might make this a private repository where each branch holds shellcode for individual engagements. However, for this demo, all shellcode will be placed on the master branch. We will also need a few different pieces of shellcode for this repository, which we’ll get from msfvenom.
+[root@coffee-kali: shellcode-library]$ msfvenom --payload windows/x64/exec CMD=calc.exe -a x64 --platform windows -f raw -o calc64.bin
No encoder or badchars specified, outputting raw payload
Payload size: 276 bytes
Saved as: calc64.bin

+[root@coffee-kali: shellcode-library]$ msfvenom --payload windows/x64/exec CMD=notepad.exe -a x64 --platform windows -f raw -o notepad64.bin
No encoder or badchars specified, outputting raw payload
Payload size: 279 bytes
Saved as: notepad64.bin

+[root@coffee-kali: shellcode-library]$ msfvenom --payload windows/exec CMD=notepad.exe -a x86 --platform windows -f raw -o notepad32.bin
No encoder or badchars specified, outputting raw payload
Payload size: 196 bytes
Saved as: notepad32.bin

+[root@coffee-kali: shellcode-library]$ msfvenom --payload windows/exec CMD=calc.exe -a x86 --platform windows -f raw -o calc32.bin
No encoder or badchars specified, outputting raw payload
Payload size: 193 bytes
Saved as: calc32.bin
Now that we have our shellcode, it’s time to create our pipeline. The pipeline’s source will be the shellcode-library which holds the shellcode we want to build into our payload. The first two tasks in our pipeline will be to download the artifacts from the Changeling and Changeling-Demo pipelines. It should look something like this:

Now that we have all of the tools we need, we need a little PowerShell to glue it all together. We will add a PowerShell task to the pipeline with the following PowerShell script that gathers all of the bin files, and runs Changeling for each bin file to produce a new artifact.
$CHANGELING_EXE = $(Get-ChildItem -Path $(Agent.TempDirectory)\changeling\ -Recurse -Filter *.exe -File).FullName
$MORPH_EXE = Get-ChildItem -Path $(Agent.TempDirectory)\morph-me\ -Recurse -Filter *.exe -File

Get-ChildItem "." -filter *.bin | ForEach-Object {
    $morphedName = "$(Build.ArtifactStagingDirectory)\$($MORPH_EXE.BaseName)_$($_.BaseName)$($MORPH_EXE.Extension)"

    iex ("$CHANGELING_EXE replace -r shellcode.bin -f $($_.FullName) -a $($MORPH_EXE.FullName) -o $morphedName")
}
That’s pretty fun! Now we have a pipeline that arms our demo project with each of the pieces of shellcode in our repository. However, if you remember, our demo project also has a JSON configuration file. We need to be able to swap that out too. For this we’ll create a new variable on the pipeline to store any number of JSON configurations for our pipeline to build. Make sure to tick the Settable at queue time box. Here are the values I used.
CONFIGURATIONS: [{"name": "DefaultConfiguration", "data": { "TARGET_PROCESS": "notepad"} }]
Notice that the CONFIGURATIONS variable holds an array of JSON objects. Each JSON object has a name (so we can identify it), and some data which our project will use. Now we can add the use of this variable into our PowerShell task.
# https://www.powershellgallery.com/packages/Dots/0.0.7/Content/Private%5CGet-ClonedObject.ps1
function Get-ClonedObject {
    param($DeepCopyObject)
    $memStream = new-object IO.MemoryStream
    $formatter = new-object Runtime.Serialization.Formatters.Binary.BinaryFormatter
    $formatter.Serialize($memStream,$DeepCopyObject)
    $memStream.Position=0
    $formatter.Deserialize($memStream)
}


$CHANGELING_EXE = $(Get-ChildItem -Path $(Agent.TempDirectory)\changeling\ -Recurse -Filter *.exe -File).FullName
$MORPH_EXE = Get-ChildItem -Path $(Agent.TempDirectory)\morph-me\ -Recurse -Filter *.exe -File

$configurations = ($env:CONFIGURATIONS | ConvertFrom-Json)
ForEach ($configuration in $configurations)  {
    Get-ChildItem "." -filter *.bin | ForEach-Object {
        $configuration = $(Get-ClonedObject $configuration)
        $morphedName = "$(Build.ArtifactStagingDirectory)\$($MORPH_EXE.BaseName)_$($_.BaseName)_$($configuration.name)$($MORPH_EXE.Extension)"

        $Utf8NoBomEncoding = New-Object System.Text.UTF8Encoding $False
        [System.IO.File]::WriteAllLines("configuration.json", ($configuration.data | ConvertTo-Json), $Utf8NoBomEncoding)

        iex ("$CHANGELING_EXE replace -r projectConfiguration.json -f configuration.json -a $($MORPH_EXE.FullName) -o $morphedName")
        iex ("$CHANGELING_EXE replace -r shellcode.bin -f $($_.FullName) -a $morphedName -o $morphedName")
    }
}

Write-Host "##vso[task.setvariable variable=CONFIGURATIONS;]erased"
Now, our PowerShell loops through each JSON object in the CONFIGURATIONS variable, and gathers all bin files from our repository, and builds a new tool for each configuration and each piece of shellcode. All that’s left to do is add a task to publish the artifacts found in $(Build.ArtifactStagingDirectory), and we will have officially turned one tool into 4 uniquely configured versions with the click of a button. Pretty cool, but what does Bob let us do?
Finally, Tell Me About Bob
We can now use Bob to configure, build, and download the artifacts presented by any pipeline in our account, and it’s extremely simple. To start, you’ll need a Personal Access Token for your Azure DevOps account which can be grabbed from https://dev.azure.com/YOUR_ACCOUNT_NAME/_usersSettings/tokens. The access you need will depend on a number of factors, but for the purposes of this demo we will give our access token full permissions. Plug that information into the bob-config.json file to tell Bob how to access your pipelines, and you’re ready to go!
Using Bob to Build Our Demo
Below is an example of using Bob to configure a blueprint that builds the pipeline we just created.
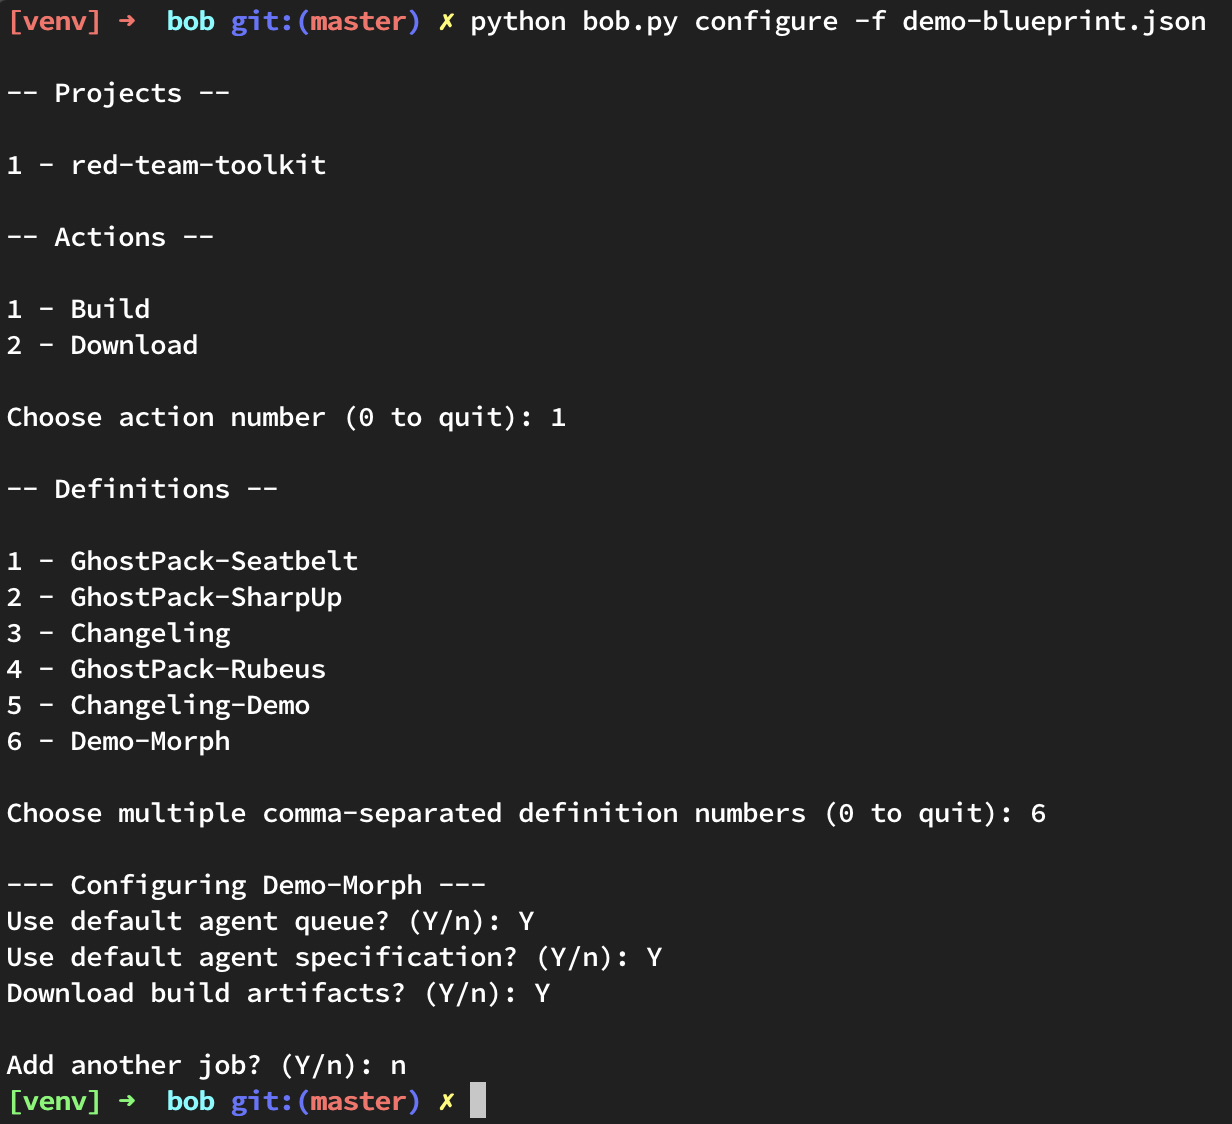
The resulting blueprint will look like this:
[
    {
        "__type__": "AzureBuild",
        "agent_queue": "Azure Pipelines",
        "agent_specification": "vs2017-win2016",
        "build_instances": [
            {
                "name": "Default",
                "queue_time_variables": {
                    "CONFIGURATIONS": [
                        {
                            "data": {
                                "TARGET_PROCESS": "notepad"
                            },
                            "name": "DefaultConfiguration"
                        }
                    ]
                },
                "tags": []
            }
        ],
        "definition": "Demo-Morph",
        "download_artifacts": true,
        "project": "red-team-toolkit",
        "source_branch": "master"
    }
]
For the most part, this JSON object should be self-explanatory. It shows the project and definition for this build, it states the artifacts from the build will be downloaded, and that it will build from the master branch of the repository. You can also see the CONFIGURATIONS variable we created earlier, and its default value. The tags field exists so that you can tag your builds for more advanced usage, which we can cover in a later post.
Let’s say we want to build Demo with the TARGET_PROCESS of notepad, but we also want to build it with a TARGET_PROCESS of calc. Do we need to run through Bob again? Nope, just add a new configuration item to the current blueprint:
...snip...

        "CONFIGURATIONS": [
            {
                "data": {
                    "TARGET_PROCESS": "notepad"
                },
                "name": "NotepadConfiguration"
            },
            {
                "data": {
                    "TARGET_PROCESS": "calc"
                },
                "name": "CalcConfiguration"
            }
        ]

...snip...
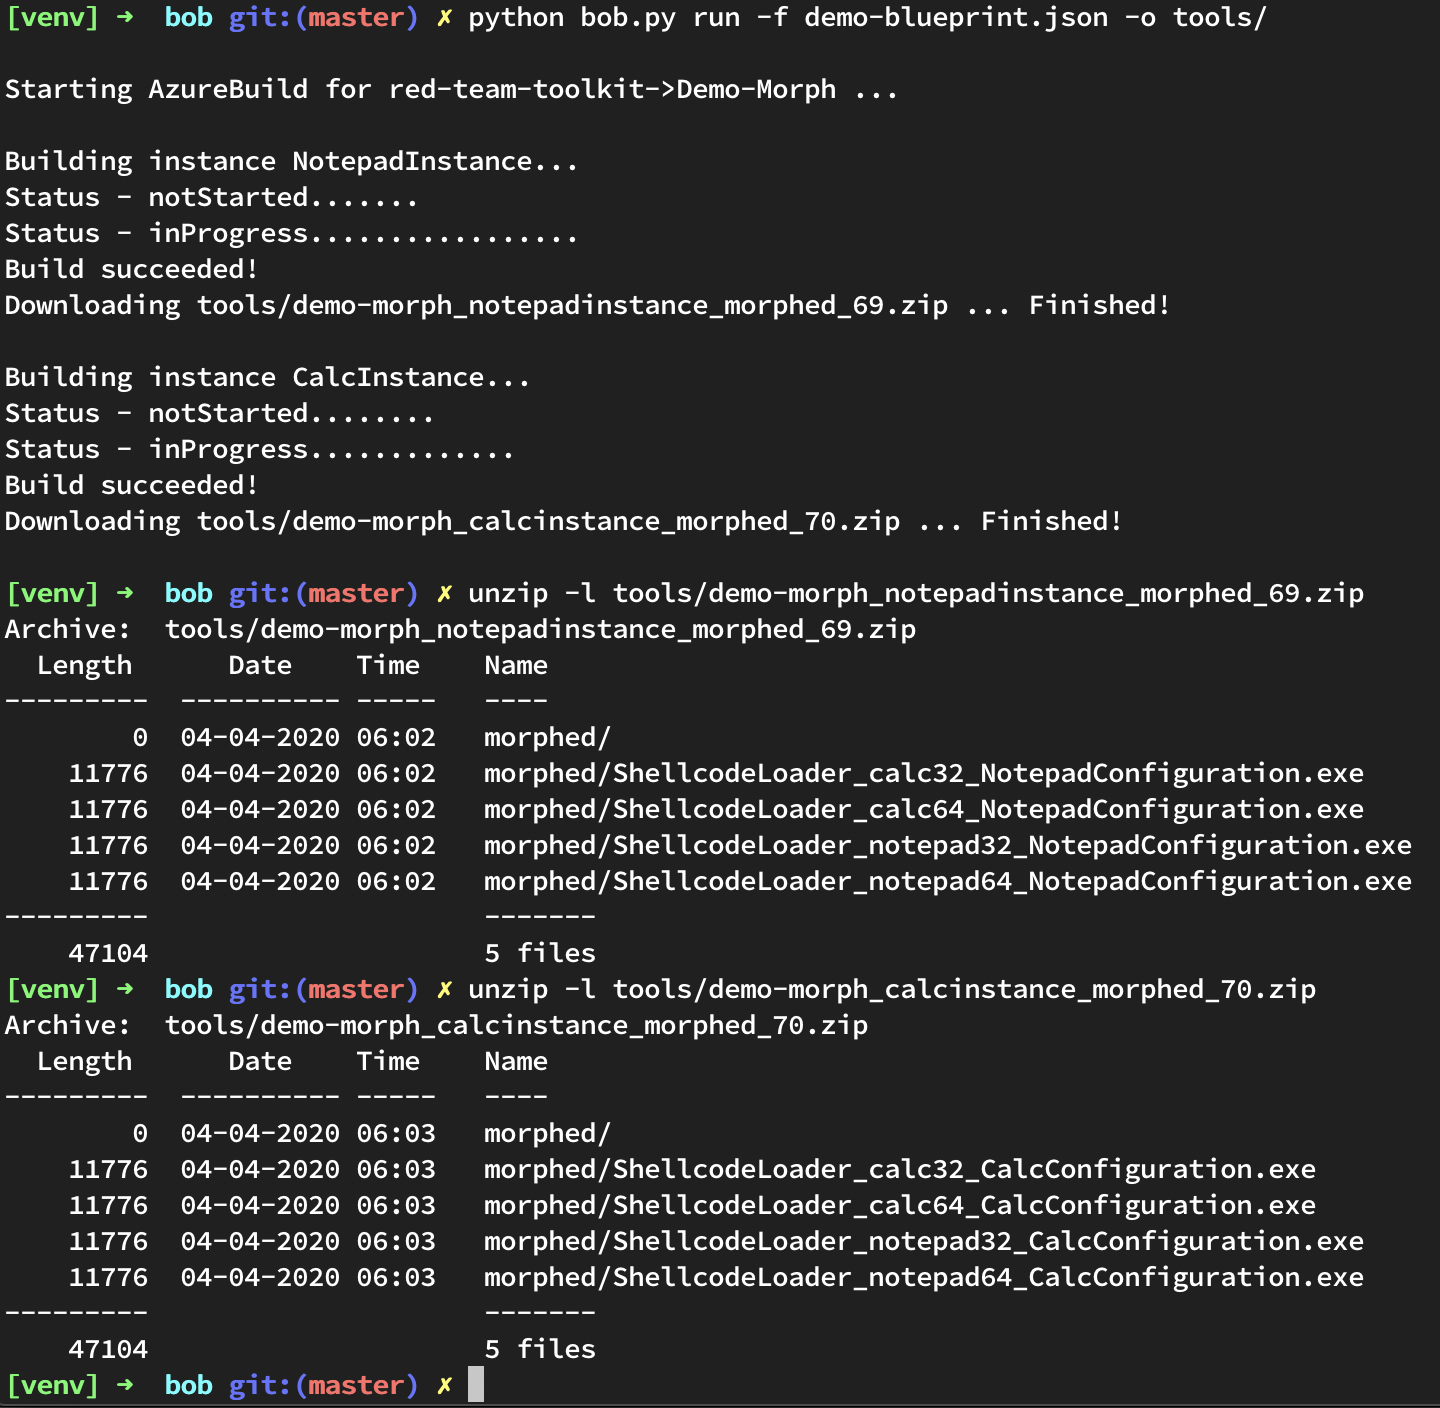
Ok, that’s pretty cool! The more elements you place in the CONFIGURATIONS array here, the more loops the PowerShell task will do, and the more payloads you’ll generate. What if you want to be able to distinguish between these builds later? In that case, you can split them into different builds on Azure DevOps by adding to the build_instances item in the blueprint, and you can use the tags item to tag them with labels for easy reference later.
[
    {
        "__type__": "AzureBuild",
        "agent_queue": "Azure Pipelines",
        "agent_specification": "vs2017-win2016",
        "build_instances": [
            {
                "name": "NotepadInstance",
                "queue_time_variables": {
                    "CONFIGURATIONS": [
                        {
                            "data": {
                                "TARGET_PROCESS": "notepad"
                            },
                            "name": "NotepadConfiguration"
                        }
                    ]
                },
                "tags": ["notepad"]
            },
            {
                "name": "CalcInstance",
                "queue_time_variables": {
                    "CONFIGURATIONS": [
                        {
                            "data": {
                                "TARGET_PROCESS": "calc"
                            },
                            "name": "CalcConfiguration"
                        }
                    ]
                },
                "tags": ["calc"]
            }
        ],
        "definition": "Demo-Morph",
        "download_artifacts": true,
        "project": "red-team-toolkit",
        "source_branch": "master"
    }
]
In the above case, you are actually queueing two separate builds in Azure DevOps, each of which will be tagged appropriately for later consumption!
Now, we sit back, and let bob build!
What Else Can Bob Do?
Bob can also be used to configure tool deployments from DevOps through the use of the Download action. Let’s look at how to configure those:
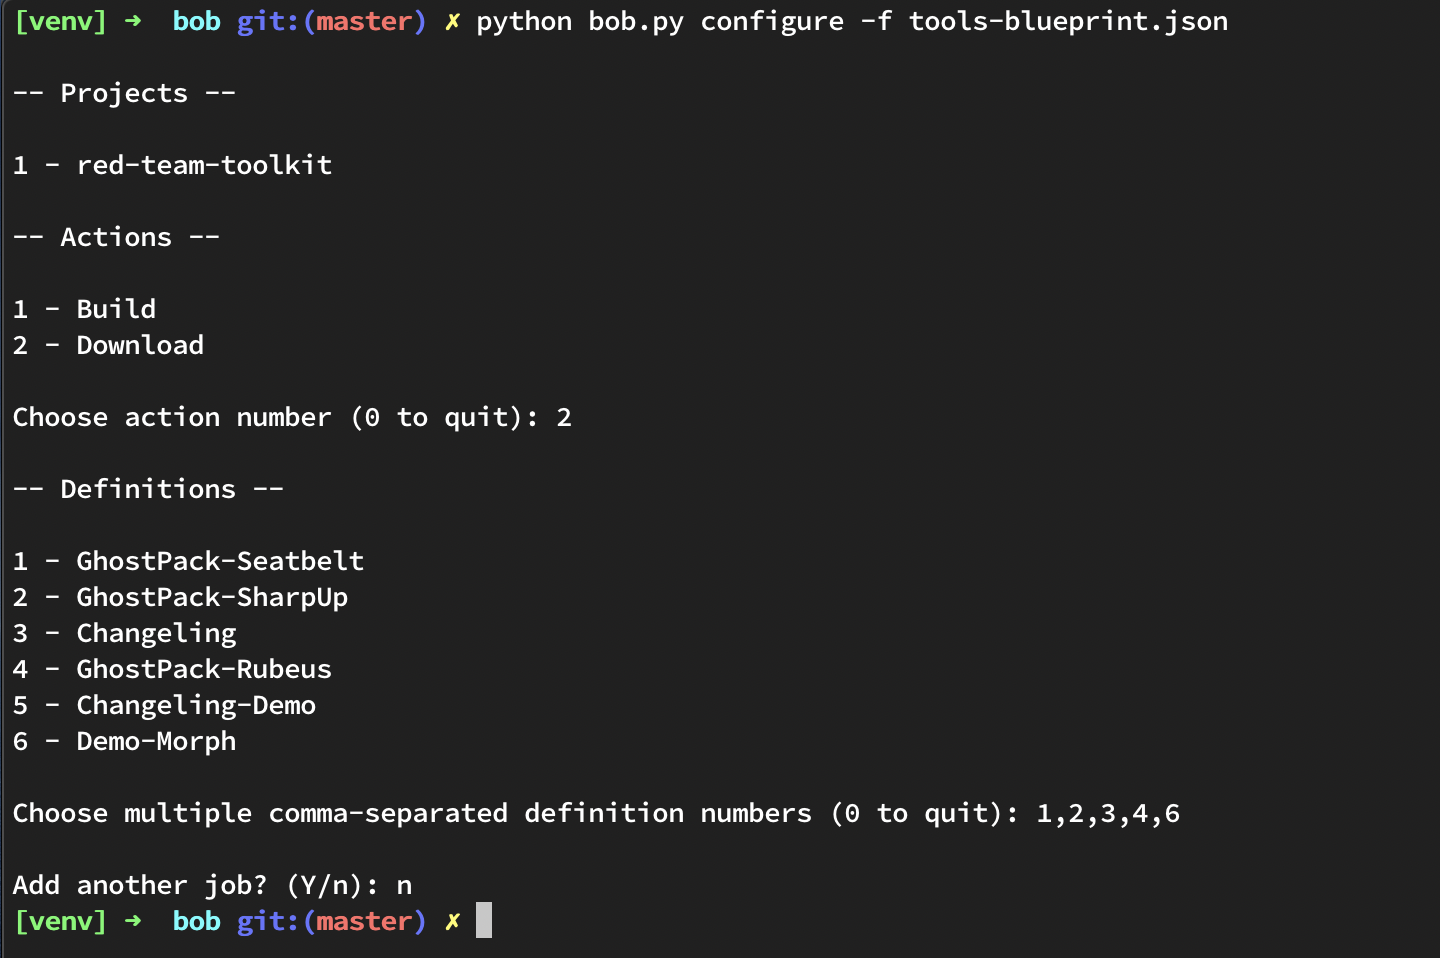
As you can see above, we were able to configure a blueprint to download all of the tools we want from Azure DevOps without having to open a browser! This comes in handy when starting a pentest or red team exercise to maximize time available for items that require more focus like developing convincing phishing pretexts..
This generates a blueprint file that looks like the following:
[
    {
        "__type__": "AzureDownload",
        "definition": "GhostPack-Seatbelt",
        "project": "red-team-toolkit",
        "source_branch": "master",
        "tags": []
    },
    {
        "__type__": "AzureDownload",
        "definition": "GhostPack-SharpUp",
        "project": "red-team-toolkit",
        "source_branch": "master",
        "tags": []
    },
    {
        "__type__": "AzureDownload",
        "definition": "Changeling",
        "project": "red-team-toolkit",
        "source_branch": "master",
        "tags": []
    },
    {
        "__type__": "AzureDownload",
        "definition": "GhostPack-Rubeus",
        "project": "red-team-toolkit",
        "source_branch": "master",
        "tags": []
    },
    {
        "__type__": "AzureDownload",
        "definition": "Demo-Morph",
        "project": "red-team-toolkit",
        "source_branch": "master",
        "tags": ["calc"]
    },
    {
        "__type__": "AzureDownload",
        "definition": "Demo-Morph",
        "project": "red-team-toolkit",
        "source_branch": "master",
        "tags": ["notepad"]
    }
]
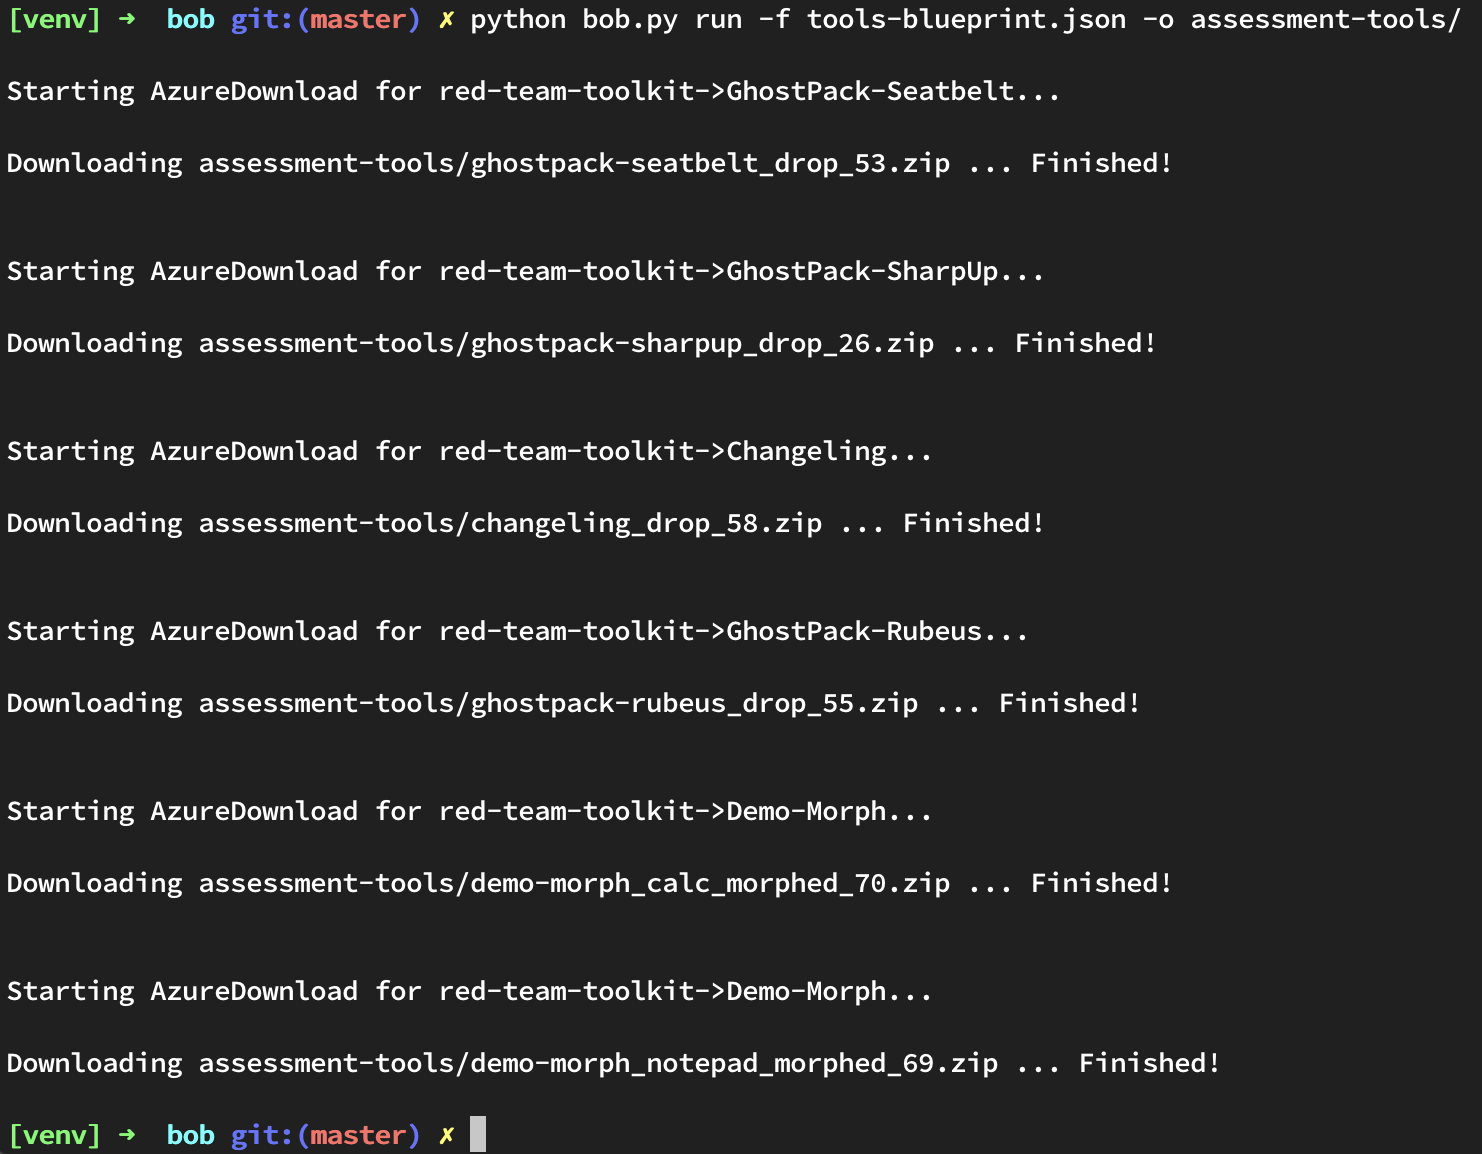
This is fairly straightforward. The only modifications you might make are to the source_branch and tags fields to suit your own requirements. The source_branch field tells Bob which Git branches the builds should have occurred on, and the tags field tells Bob which Azure DevOps Build Tags to download (these are not Git tags). If you recall from earlier, we tagged our Demo-Morph builds with calc and notepad tags to distinguish between which application the build would inject into. We use those tags in teh blueprint above to download the appropriate versions. Upon running this with Bob, as expected, all of the listed tools are retrieved and ready for your next engagement.
Integrating Bob
The obvious way to integrate Bob into your workflow is to manually run it. If you want to be super cool and hip and trending with the cool kids though, you’ll be using Ansible. So, you can find an ansible role for Bob on my GitHub!
Coffee Break!
We’re not all done here. There are still several steps to automate evasion techniques and reduce the blue team’s ability to signature payloads , but this is a good start. I’m encouraged to see all of the work done in automation for offensive tooling, and I can’t wait to see how it evolves. Hopefully, this post has given you new ideas around the idea of automation, and I look forward to hearing about them. So, please share those new ideas, and happy hacking!